Ever pondered whether you could learn to crochet on your own? You can indeed learn to crochet!
Welcome to the world of crochet!
If you’ve ever admired a cozy handmade scarf or a delicate doily and wondered, “Could I make that?” — you’re in the right place. This beginner’s guide is designed to help you take your very first steps into the art of crochet.
Whether you’re looking for a relaxing new hobby or dreaming of creating your crochet masterpieces, this guide will walk you through the essentials — from tools and techniques to simple patterns to get you started.
After finishing this beginner’s crochet tutorial, you’ll be able to make lovely things like baby frocks, caps, plushies, and scarves, among other things! The KNITSKNOTS_BY_APOORVA blog offers a plethora of free crochet designs for you to learn.
Where to start when learning how to crochet?
Luckily, crocheting doesn’t require a great deal of tools to get started. To begin, you need to have a few tools on hand:
– Yarn
Let’s take a closer look at these, as there is an option within the two that is more suitable for a beginner.
A Yarn
Initially, selecting a yarn can be a bit overwhelming. The materials and yarn weights vary widely. The two main categories of yarn materials are synthetic yarn, which includes acrylic and nylon, and natural fibers, such as cotton, wool, alpaca, and merino. The type of project you are working on and your preferences may determine which option you select.
The Weight
There may be several names used to refer to the same weight of yarn when discussing its various weights. Aran weight yarn (also known as worsted-weight or medium weight yarn) or DK (double knit) weight yarn are the first yarns I would suggest using.
Hook for crocheting:
There are numerous sizes of crochet hooks available. This is because the yarn weight you are using must be matched with the size of a crochet hook. To determine the size of the hook you will want, you must consult the label of the yarn. The instructions often provide information on several metrics that are utilized globally.
You will require:
Hook for Yarn Crochet (or Hook Set)
Sewing scissors for embroidery
Yarn needle for darning
Initially, stitch markers are not necessary.
A measuring tape is a useful addition to every crochet kit; however, it is not initially necessary.
A step-by-step tutorial on crocheting
Step 1: Grasping the crochet hook
You can hold your hook whichever you feel most comfortable. Although my dominant hand is my right, you may use your left. These are two of the most widely used gripping techniques; however, I should emphasize that I have observed other variations over the years. To hold your hook, you’ll use your dominant hand.
Step 2: Holding the yarn
Your non-dominant hand will be used to hold the yarn. Once more, there are various approaches to this, and you might discover that it evolves. While executing our stitches, we want to make sure that the yarn is under the required tension. As you start to crochet, this is a fantastic method to hold your yarn.
Simple Stitches
We will go over the fundamental stitches, which will enable you to create basic crochet patterns and stitches once you have mastered them. To start with, we will first examine how to make a slip knot and work chain stitches.
Step 3: Slip Knotting
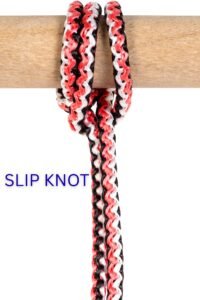
To start, we must tie a slip knot to attach to our hook.
To tie a slip knot: Bring the tail end of the yarn to the front as you wrap it around the index finger from front to back.
From front to back, loop the yarn’s working end around the finger.
Over the front loop, pull the back loop.
Keep removing the rear loop from your finger. After removing the finger’s remaining loop, insert the crochet hook.
Single Crochet in the UK
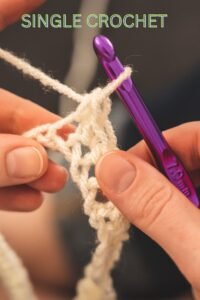
Put your hook into the stitch or chain.
Over the hook, yank.
You will have two loops on the hook after pulling through the first one.
Pull the yarn through the hook’s two loops after you’ve finished yarning over.
Step 4: Making rows with your work
It’s time to turn your work so that you can go back the other way after finishing your first row.
You will be turning your work like a book page if you are right-handed.
Starting your next row (turning chain), you must reach the height of the stitch you are working on to work your subsequent stitches. This will vary from person to person.
Counting stitches
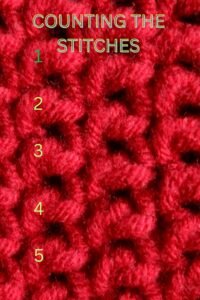
Counting your stitches at the end of your row will help you make sure you have the same number as row 1. Finding the Vs and tilting your work in your direction can help you achieve this.
Step 5: How to secure
We can now proceed with fastening off, which is the process of finishing your swatch. Chain 1. In order to facilitate sewing in the end, trim your yarn with a good tail end. After removing the hook, pull the yarn through the loop.
To fasten, pull tightly.
Step 6: Attach the ends
Sewing in the tail ends, also known as loose ends, is the last step. I prefer to apply the “rule of three.” This implies that in order to assure that the tail end is completely secure, we will work back and forth and back again.
We can now proceed with fastening off, which is the process of finishing the Thread on the darning needle.
In a single direction, weave the needle in and out of the stitches or fibers for two to three inches.
Catch various fibers by weaving back the other direction.
Catch several fibers and weave back again.
Cut off the leftover yarn.
“Now that you’ve learned the basics, what will be the first thing you crochet? A cozy scarf, a cute coaster, or something unique? Tell me in the comments – I’d love to hear your ideas!”
……………………………………………………………………………………………….END………………………………………………………………………………………………………………